The Essential Non-Perishable Food List for Emergency Kit
Get a practical non-perishable food list for emergency kit prep. Find out what to stock, how much you need, and tips for safe, long-term storage.
A generic emergency kit won't work for every family. If you have an infant who needs formula, a child with a severe nut allergy, or a family member with a medical condition like diabetes, your food supply needs to be customized. During a high-stress event like an evacuation, the last thing you need is a medical crisis caused by a lack of appropriate food. A thoughtful plan provides more than just calories; it ensures everyone's specific health needs are met when it matters most. This guide goes beyond the basics, helping you tailor a non-perishable food list for emergency kit creation that accounts for every member of your household, so your preparations are truly comprehensive and reliable.
Pay Less for Home Insurance
and Avoid Non-Renewal?
Our partner, Five Bays Insurance Agency, offers a free policy checkup that spots hidden discounts to make sure you’re not paying more than you should.
Key Takeaways
- Establish Your 72-Hour Lifeline: Your first priority is a three-day supply of non-perishable food and water (one gallon per person, per day). Focus on calorie-dense, no-cook items like canned meats, nut butters, and energy bars to ensure your family can stay fed and energized without power.
- Protect Your Supply with Proper Storage: Keep your food safe from spoilage and pests by storing it in a cool, dark, dry place using airtight containers. Set a six-month calendar reminder to check expiration dates, using and replacing older items to keep your kit fresh and reliable.
- Plan for Your Family's Unique Needs: A standard kit won't cover everyone. Pack specific items for infants, children, and anyone with medical diets or allergies, and don't forget essential non-food tools like a manual can opener, utensils, and water purification tablets.
Why You Need an Emergency Food Kit
When a wildfire threatens your community, the last thing you should be worrying about is what to eat. Evacuation orders can come suddenly, and power outages can leave you without a working refrigerator or access to open stores. An emergency food kit isn't just a "nice-to-have"—it's a fundamental part of being prepared. It ensures you and your family can stay fed and focused during a crisis.
After a major disaster, emergency services are stretched thin. It’s crucial to have a plan to survive on your own for several days until help is available or services are restored. Having a dedicated supply of non-perishable food and water means you aren’t dependent on outside help in those critical first 72 hours. You can stay put safely or grab your kit and go, knowing your family’s basic needs are covered.
Facing a wildfire is stressful enough. A well-stocked food kit helps remove a major source of anxiety, reducing stress and worry for everyone in your household. In an emergency, your body also uses more energy. You’ll need access to high-energy, high-protein foods to maintain your strength and keep your immune system functioning properly, which is especially important when you’re away from home or dealing with smoke and ash.
Building your food supply is a simple, powerful step you can take to protect your family. It’s a core component of a solid emergency strategy, giving you control in an unpredictable situation. Once your kit is ready, you can integrate it into your complete Wildfire Action Plan to ensure every aspect of your safety is covered.
What to Stock in Your Emergency Food Kit
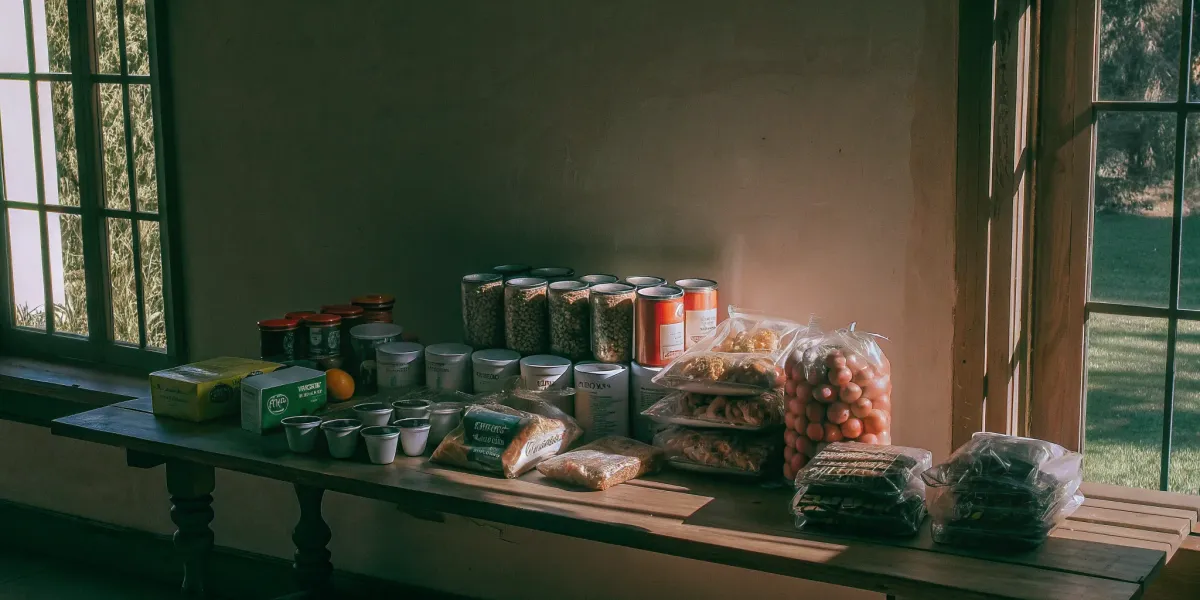
When an evacuation order comes, the last thing you want to worry about is what to eat. Having a well-stocked emergency food kit means you’re prepared with safe, familiar, and nutritious food that doesn’t require refrigeration or cooking. Your goal is to have enough non-perishable items to sustain your family for at least three days. Here’s a breakdown of what to include, category by category, to build a balanced and reliable supply.
Proteins and Meats
Protein is essential for keeping your energy levels up and feeling full during a stressful time. Canned meats like tuna, chicken, salmon, and turkey are excellent choices because they are ready to eat and can last for at least two years in your pantry. Don’t forget plant-based options, too. Canned beans, lentils, and chili are packed with protein and fiber. When you build your kit, look for pop-top cans to avoid needing a can opener, though you should always pack one just in case. These items provide the staying power your family will need if you’re displaced from your home or without power for an extended period.
Fruits and Vegetables
Getting your daily dose of vitamins and minerals is just as important in an emergency. Stock up on canned fruits packed in their own juice or water, not heavy syrup, to avoid added sugars. Low-sodium canned vegetables like green beans, corn, and carrots are also great to have on hand. Dried fruit, such as raisins, apricots, and mangoes, is another fantastic option. It’s lightweight, takes up very little space, and provides a quick source of natural energy and nutrients. Including these items ensures your emergency meals are balanced and helps maintain a sense of normalcy with familiar, healthy foods.
Grains and Starches
Comfort foods can make a big difference in a crisis, and many grains and starches fit the bill perfectly. Think about items that are filling and have a long shelf life. Dry pasta and jars of pasta sauce are great staples. Rice and dried beans are an inexpensive and powerful combination that provides a complete protein when eaten together. For no-cook options, include whole-grain crackers, pretzels, and ready-to-eat cereals that your family enjoys. These are easy to pack and can be eaten on the go, making them a versatile part of your emergency food supply.
Nuts, Seeds, and Energy Bars
For a quick and portable energy source, nothing beats nuts, seeds, and bars. Peanut butter, almond butter, and other nut butters are packed with protein and healthy fats. Unsalted nuts and seeds, like almonds or sunflower seeds, are also excellent choices. Granola bars and protein bars are designed for portability and have a long shelf life, making them perfect for a grab-and-go bag. These calorie-dense foods are crucial for maintaining your strength and stamina when you might be more physically active than usual, such as during an evacuation. They require no preparation and can be a lifesaver when you need a quick bite.
Shelf-Stable Drinks and Dairy
Hydration is the most critical element of your emergency kit. The standard rule is to store at least one gallon of water per person, per day, for a minimum of three days. Don’t forget to include pets in your calculation. Beyond water, consider shelf-stable drinks to keep morale up. Powdered or shelf-stable milk (the kind in aseptic boxes) is great for children and can be used with cereal. You can also pack juice boxes or powdered electrolyte drinks to help everyone stay hydrated. Having a safe and adequate supply of fluids is a top priority for any disaster readiness plan.
How Much Food Does Each Person Need?
Figuring out how much food to store can feel like a guessing game, but it doesn't have to be. The key is to move from a vague idea of "enough" to a concrete plan that covers every person in your household. When you're facing an evacuation order or a power outage, the last thing you want to worry about is whether you packed enough food and water. A simple calculation can give you peace of mind. Think about the number of people you need to feed, their specific energy needs, and how long you might be on your own. This approach ensures you have a practical, life-sustaining supply ready to go when you need it most.
Start with a Three-Day Supply
The baseline for any emergency kit is a three-day supply of non-perishable food and water for each person. Why three days? This is the critical window after a wildfire or other disaster where emergency services may be overwhelmed and unable to reach you immediately. Having these resources on hand means you can sustain your family independently until help arrives or services are restored. This initial supply is the foundation of your entire emergency plan. You can always build on it, but starting with a solid 72-hour kit is a crucial first step in your wildfire preparedness.
Calculate Your Family's Daily Calorie Needs
Beyond the three-day rule, it’s important to think about individual needs. A good rule of thumb for water is to store one gallon per person, per day, which covers both drinking and basic hygiene. For food, remember that stressful situations can burn more energy, so focus on calorie-dense, high-protein items that will keep you going. While a specific calorie count varies by age and activity level, aiming for at least one balanced meal per day is a great target. The goal is to have a complete kit that meets your family’s unique needs, especially for children and anyone with higher energy requirements.
How to Store Your Emergency Food Supply
Building your emergency food kit is a huge step, but how you store it is just as important. The last thing you want during a crisis is to discover your carefully planned food supply has spoiled, been contaminated by pests, or is past its expiration date. Proper storage protects your investment and ensures your family has safe, nutritious food ready when you need it most.
Think of your food supply as a critical piece of your home's safety equipment. Just like a fire extinguisher, it needs to be stored correctly to function properly in an emergency. The goal is to create a stable environment that maximizes shelf life and keeps your food protected from its main enemies: heat, light, moisture, and pests. A few simple steps can make all the difference, turning a box of groceries into a reliable lifeline. Your storage location and methods are key to keeping your emergency food safe and ready for years. This isn't just about avoiding waste; it's about ensuring your family's well-being when outside help might not be available. Taking the time to set up your storage correctly now will save you from significant stress and potential danger later.
Find a Cool, Dark, and Dry Place
Heat, light, and moisture are the biggest enemies of shelf-stable food. They accelerate the breakdown of nutrients, alter textures and flavors, and can lead to spoilage. Your mission is to find a storage spot that minimizes exposure to all three. The ideal location is consistently cool (between 50°F and 70°F), dark, and has low humidity.
Good options include a pantry, a cool closet, or even the space under a bed in a climate-controlled room. Avoid places with drastic temperature swings, like a garage, attic, or shed. According to food safety experts at UGA Extension, you should "store dry foods...away from light and in cool places" to maintain their quality and longevity.
Use Airtight Containers to Keep Pests Out
Original packaging like cardboard boxes and thin plastic bags are not enough to protect your food supply long-term. They are easily compromised by moisture and offer little defense against insects and rodents. Transfer dry goods like rice, pasta, beans, and oats into sturdy, airtight containers to create a reliable barrier.
Food-grade plastic buckets with gamma seal lids, glass jars with tight-fitting lids, or Mylar bags are all excellent choices. This practice not only keeps pests out but also protects against moisture and oxygen, which can cause food to spoil. As UGA Extension advises, using "airtight, moisture-proof containers" is a crucial step for keeping your supply safe and secure from contamination.
Label and Date Everything
In the stress of an emergency, you won’t have time to guess what’s in each container or if it’s still safe to eat. A clear labeling system is your best friend. Use a permanent marker to label every container with its contents and the date you stored it. If a package doesn't have a "use by" date, it's a good practice to "write the purchase date and the date you open it."
Consider storing all your emergency supplies in one dedicated spot and clearly marking the area. Labeling your bins "Emergency Food" helps ensure no one dips into the stash for a regular weeknight dinner. This simple organizational step makes it easy to see what you have, track expiration dates, and rotate your stock efficiently.
How Often Should You Rotate Your Food Supply?
Building your emergency food kit is a huge step, but it’s not a one-and-done task. Food doesn’t last forever, even the non-perishable kind. To make sure your supply is safe, fresh, and ready when you need it, you’ll need to rotate your stock. This simply means using the older items and replacing them with new ones. It prevents waste and ensures you’re never caught with expired or spoiled food during an emergency. Think of it as simple, proactive maintenance for your peace of mind.
Check Your Stash Every Six Months
Set a reminder on your calendar to do a quick audit of your emergency food supply every six to twelve months. This is your chance to check expiration dates on everything from canned goods to energy bars. Pull everything out, take inventory, and make a list of items that are nearing their expiration date. This regular check-in helps you stay organized and ensures your kit is always reliable. It’s a small time investment that pays off big when you need to count on your supplies. This practice is a core part of any effective emergency preparedness plan.
Use the "First In, First Out" Rule
The easiest way to manage your food supply is with the "First In, First Out" (FIFO) method. When you add new items to your kit, place them in the back. Move the older items to the front where you can see them. Then, incorporate those front-row items into your regular meals before they expire. This system ensures you’re constantly cycling through your stock, keeping everything fresh. By regularly consuming and replacing your emergency foods, you minimize waste and keep your kit updated without having to throw anything away.
Know the Warning Signs of Spoilage
When you’re checking your supplies, your eyes and nose are your best tools. It’s critical to know the signs of spoilage to keep your family safe. For canned goods, look for severe dents (especially on the seams), rust, bulges, or leaks. If a can hisses loudly when you open it or the contents spurt out, that’s a major red flag. Discard any food that has an unusual odor, color, or texture. Trust your instincts—if something seems off, it’s not worth the risk. When in doubt, throw it out and replace it immediately to maintain a safe food supply.
What If My Family Has Special Dietary Needs?
A generic emergency food kit won't work if someone in your family has specific dietary requirements. During an evacuation or power outage, the last thing you need is a medical emergency caused by a food allergy or a lack of essential nutrition for an infant. Customizing your kit is not just a good idea—it's a critical step in ensuring everyone stays safe and healthy when stress levels are already high. A standard kit filled with high-sodium canned goods could be problematic for someone with high blood pressure, just as a peanut-butter-heavy supply is dangerous for someone with a nut allergy.
Think about the unique needs of each person in your household, from the youngest to the oldest. This means planning for babies, toddlers, and anyone with food allergies, intolerances, or medical conditions like diabetes. A well-thought-out food supply provides more than just calories; it offers peace of mind, knowing that everyone's needs are covered when it matters most. Your Wildfire Action Plan should account for these details, making your emergency preparations truly comprehensive. Before you start stocking up, take a moment to inventory your family's dietary needs. What does your baby need? What foods must your teenager with a nut allergy avoid? Does a family member require low-sodium or gluten-free options? Answering these questions now will prevent a crisis later.
Plan for Infants and Children
Babies and young children have very specific nutritional needs that can't be met by standard emergency rations. Your kit must include ready-to-feed formula, bottled water for mixing powdered formula, and single-serving baby food jars or pouches. Don't forget to pack bottles, nipples, and spoons. For toddlers and older kids, stock familiar, comforting snacks they'll actually eat, like fruit pouches, crackers, and granola bars. Stress can reduce a child's appetite, so having their favorite foods on hand can make a difficult situation a little easier. The CDC offers detailed guidance on infant feeding in emergencies to help you prepare.
Accommodate Food Allergies and Medical Diets
For family members with food allergies or medical conditions, careful planning is essential. Cross-contamination can be a serious risk in an emergency, so pack their food separately if possible. Read labels meticulously when purchasing supplies to ensure they are free from allergens like nuts, dairy, or gluten. For individuals with conditions like diabetes, include items that help manage blood sugar, such as glucose tablets, juice boxes, and protein bars. According to Ready.gov, your emergency kit should always be tailored to your family's specific health conditions. Make a list of "safe" foods and keep it with your kit to avoid any guesswork during a stressful event.
Don't Forget These Essential Non-Food Items
Your carefully planned food supply won't do you much good if you can't open the cans or have no safe water to drink. When you're preparing for an emergency, it’s easy to focus on the food and forget the essential tools needed to prepare and consume it. In a stressful situation, the last thing you want is a kit full of canned chili and no way to open it.
Beyond the food itself, a few key non-food items are critical for your safety and comfort. These supplies turn your stockpile of ingredients into actual, life-sustaining meals. Thinking through these details now is a core part of building a reliable emergency plan. Having a complete kit ready to go gives you peace of mind and makes a chaotic situation more manageable. A well-stocked kit is a cornerstone of your overall Wildfire Action Plan.
Pack a Manual Can Opener and Cooking Supplies
This might sound obvious, but a manual can opener is one of the most crucial items in your kit. Power outages are common during emergencies, so your electric opener will be useless. Pack at least one, and maybe even a backup. Along with it, include basic utensils, sturdy paper plates, and cups.
If you plan to heat food, which can be a huge morale-booster, pack a small camp stove or grill with plenty of fuel. Just remember to always use them outdoors in a well-ventilated area. A multi-tool or a simple knife can also be incredibly useful for opening packages and other small tasks. The goal is to have a self-sufficient disaster kit that doesn't rely on your home's utilities.
Store and Purify Water Correctly
Water is the single most important item in your emergency supply. The standard recommendation is to store at least one gallon of water per person, per day. Aim for a minimum three-day supply, but more is always better if you have the space. This amount covers what you’ll need for drinking, food preparation, and basic personal hygiene.
Commercially bottled water is your safest bet, as it’s sealed and easy to store. Keep it in a cool, dark place and pay attention to any expiration dates. As a backup, it’s smart to have a way to purify water. This could be a portable water filter, iodine tablets, or plain, unscented household bleach. Knowing how to make water safe in an emergency is a vital skill.
How to Build Your Kit Without Breaking the Bank
Building an emergency kit can feel like a huge upfront expense, but it doesn't have to be. With a little planning, you can stock your pantry with everything you need without draining your bank account. The key is to think strategically about what you buy and how you buy it. Instead of one massive shopping trip, you can gradually build your supply over time. This approach makes preparedness feel much more manageable and ensures your family is ready for anything, from a power outage to an evacuation order. A well-stocked kit is a core part of any Wildfire Action Plan, giving you peace of mind and one less thing to worry about during a crisis.
Shop Smart and Buy in Bulk
One of the best ways to save money is to buy staple foods in bulk. Items like rice, beans, oats, and pasta are significantly cheaper when purchased in larger quantities. You can then repackage them into smaller, airtight containers for long-term storage. To avoid waste, treat your emergency stash like an extension of your pantry. Use the "First In, First Out" (FIFO) method: when you buy a new bag of rice, move the older one to the front of your pantry to be used next. This rotation keeps your supply fresh and spreads the cost out over months, rather than forcing a single, expensive shopping trip.
Prioritize High-Nutrition Foods
When every inch of storage space counts, you want to make sure your food provides the most bang for your buck, nutritionally speaking. Focus on high-energy and nutrient-dense items that will keep you and your family fueled. Think peanut butter, nuts, dried fruit, granola bars, and canned meats or fish. Canned goods are especially useful because they are already cooked and can be eaten without heating, which is critical if the power is out. These foods provide the protein, healthy fats, and carbohydrates your body needs to handle the stress of an emergency situation, making them a smart and efficient choice for your kit.
Create Your Complete Emergency Food Plan
Putting together an emergency food supply can feel like a huge task, but it doesn't have to be. The goal is to have a simple, reliable plan so you aren't scrambling for supplies when an evacuation order comes. Think of it as one less thing to worry about. A well-stocked kit is a critical piece of your family's overall safety net, giving you peace of mind and self-sufficiency for several days.
Start by building a shopping list for a three-day supply of non-perishable food for each person in your household. Focus on ready-to-eat items that don't require cooking or refrigeration. Your list can include a mix of:
- Proteins: Canned tuna, chicken, or salmon; canned beans and lentils; nut butters.
- High-Energy Foods: Granola bars, trail mix, crackers, and dried fruit.
- Fruits and Vegetables: Canned options packed in water or 100% juice.
- Comfort Foods: Things your family enjoys, like cookies or instant coffee, can make a stressful situation a little more manageable.
Once you have your food, store it properly to ensure it stays safe and fresh. Find a cool, dark, and dry spot like a pantry or a dedicated bin in your garage. Use airtight containers for items like rice or cereal to keep them protected from pests and moisture. Remember to label everything with the date you purchased it. This makes rotation easy and prevents you from having to guess if something is still good. A simple system now saves you a major headache later.
Finally, your food plan isn't a "set it and forget it" project. You'll need to maintain it. A good rule of thumb is to check your supply every six months. Use and replace items that are nearing their expiration date. This "first in, first out" method keeps your stash fresh and reduces waste. An emergency food supply is a living part of your home safety strategy. Integrating it into a complete Wildfire Action Plan ensures your family is prepared for every possibility.
Related Articles
Pay Less for Home Insurance
and Avoid Non-Renewal?
Our partner, Five Bays Insurance Agency, offers a free policy checkup that spots hidden discounts to make sure you’re not paying more than you should.
Frequently Asked Questions
What if I don't have a lot of storage space for a big emergency kit? You don't need a dedicated storeroom to be prepared. Start with a sturdy backpack for each family member that can hold a 72-hour supply of essentials. This "grab-and-go" bag can be stored in a closet or under a bed. For your larger supply, think creatively about unused space. You can use airtight, flat containers that slide under a bed or stack neatly at the back of a pantry. The goal is to have your supplies accessible, not to build a bunker.
Is it okay to store my emergency food in the garage or a shed? It’s best to avoid storing food in garages, sheds, or attics. These spaces often experience extreme temperature swings, from very hot in the summer to cold in the winter. That heat can degrade the quality and safety of your food much faster than the expiration date suggests. Stick to a location inside your home where the temperature is stable, like a pantry, a cool closet, or an interior storage area.
What's the easiest way to start building a kit if I'm on a tight budget? You don't need to buy everything at once. The most effective approach is to build your kit gradually. Each time you go grocery shopping, add one or two extra items to your cart, like a can of beans, a jar of peanut butter, or a gallon of water. Focus on inexpensive, high-calorie staples first. Over a couple of months, you’ll have a solid foundation without a major hit to your wallet.
Besides food and water, what's one essential item people always forget? A reliable manual can opener is the most commonly forgotten, yet most critical, tool for your kit. Power outages are extremely common during wildfires and other emergencies, so your electric opener will be useless. Without a manual one, your supply of canned goods is inaccessible. Pack one in your kit, and maybe even a spare. A good multi-tool with a can opener is another excellent option.
How should I plan an emergency food supply for my pets? Your pets are part of the family, so their needs are just as important. Pack at least a three-day supply of their regular food in an airtight, waterproof container. Remember to also store extra water specifically for them, as their needs can increase with stress. It's also a good idea to include collapsible food and water bowls, along with any necessary medications they take.