Fire Hardening Home Checklist: A Step-by-Step Guide
Get a practical fire hardening home checklist with clear steps to protect your property, reduce wildfire risk, and improve your chances of keeping insurance.
It’s a common misconception that if a wildfire sweeps through your neighborhood, every home is destined to burn. The reality is that many homes survive, and it’s rarely due to luck. Survival is often the result of deliberate, proactive steps taken by the homeowner. This process is called home hardening. It’s a systematic approach to reducing your home’s vulnerabilities by using fire-resistant materials, sealing gaps where embers can enter, and creating defensible space. These actions not only give your home its best chance of survival but also make it a much lower risk for insurers. This guide provides a clear roadmap, starting with a detailed fire hardening home checklist to help you begin.
Pay Less for Home Insurance
and Avoid Non-Renewal?
Our partner, Five Bays Insurance Agency, offers a free policy checkup that spots hidden discounts to make sure you’re not paying more than you should.
Key Takeaways
- Focus on Stopping Embers First: Most homes ignite from tiny, wind-blown embers, not the main wall of fire. Prioritize simple, high-impact fixes like screening vents with 1/8-inch metal mesh and clearing a five-foot, non-combustible zone around your foundation.
- Combine Home Upgrades with Defensible Space: True protection involves two layers of defense. Harden your home's structure with fire-resistant materials for your roof and siding, and manage the surrounding landscape up to 100 feet out to slow a fire's approach.
- Document Everything for Your Insurer: Your home hardening efforts are crucial for maintaining insurance. Keep detailed records, photos, and receipts of all upgrades to prove your risk reduction to carriers, which can help you keep your policy and qualify for discounts.
What Is Home Hardening and Why Does It Matter?
When you hear about protecting a home from wildfire, you might picture a massive wall of flames. But the reality is often much smaller and sneakier. The biggest threat to most homes isn't the main fire front, but the millions of tiny, burning embers that ride the wind for miles ahead of it. Home hardening is the process of making your house more resistant to these embers, as well as to radiant heat and direct flames. It involves using fire-resistant materials and modifying the most vulnerable parts of your home—like your roof, vents, and windows—to prevent ignition.
Think of it as creating a protective shield around your property. By taking these steps, you significantly increase the chances that your home will survive a wildfire, even if you aren't there. More importantly, in a time when insurance companies are pulling back from high-risk areas, a hardened home is a more insurable home. It shows insurers you’ve taken proactive steps to reduce your risk, which can be the key to keeping your coverage or finding a new policy. It's one of the most effective ways to regain a sense of control when facing wildfire threats and insurance uncertainty.
Understanding Ember Attacks and Home Ignition
Most homes lost in wildfires are not consumed by a giant wall of fire. Instead, they are ignited by embers—small pieces of burning wood and vegetation that can travel a mile or more in the wind. These embers act like flying matches, landing in gutters filled with dry leaves, on flammable doormats, or in tiny crevices around windows and vents. Once a small fire starts in one of these vulnerable spots, it can quickly spread to the rest of the house.
The goal of home hardening is to eliminate these easy ignition points. By understanding that the primary threat comes from these wind-driven embers, you can focus your efforts on the changes that matter most. Preparing your home for wildfire means addressing the small details that could lead to a big disaster.
How Hardening Protects Your Property and Insurance
Home hardening is your first line of defense. It focuses on reinforcing your home’s structure to withstand the triple threat of embers, radiant heat, and direct flames. This means upgrading materials and sealing gaps where embers could get inside. Simple fixes like installing fine mesh screens on vents or more significant projects like replacing an old wood-shake roof with a Class A fire-rated one can dramatically improve your home’s survivability.
These actions do more than just protect your property; they protect your financial future. Insurance carriers are looking for tangible proof that you are managing your wildfire risk. A well-hardened home is less likely to result in a total loss, making it a better bet for insurers. Taking these steps can make your home safer and easier to insure, potentially helping you maintain coverage in a tough market. It’s a powerful way to take control of your wildfire risk.
Your Home Hardening Checklist
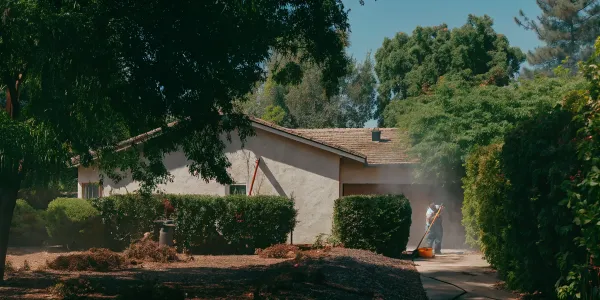
Tackling home hardening can feel overwhelming, but breaking it down into a checklist makes it manageable. The goal is to create layers of protection that reduce the chances of your home igniting from embers or radiant heat. It’s a common misconception that homes are lost to a giant wall of flames. In reality, most homes that burn down in a wildfire are ignited by a blizzard of embers that can travel a mile or more ahead of the main fire. These tiny, burning particles get into the smallest cracks and crevices, landing on your roof, in your gutters, or blowing into vents. They can ignite your home from the inside out or set fire to flammable materials you have near your house. This checklist focuses on the most critical upgrades you can make to your home’s exterior, interior, and overall preparedness plan. By addressing these vulnerabilities step-by-step, you can give your property its best chance of survival and show insurance companies that you are proactively managing your risk. Think of it as building a shield around your home, one piece at a time.
Key Exterior Upgrades
Your home's exterior is its first line of defense. Start by focusing on the most vulnerable areas where embers can land and ignite. Your roof is a primary target, so it’s crucial to use fire-resistant roofing materials like metal, clay tile, or Class A asphalt shingles. Next, address your vents. Cover all attic, foundation, and eave vents with 1/8-inch metal mesh to stop embers from getting inside. Windows are another weak point; installing double-pane tempered glass can prevent them from shattering from the heat. Finally, ensure your siding is made from non-combustible materials like stucco or fiber-cement, and keep your deck clear of flammable items.
Interior Safety Measures
While most of the work happens outside, a few interior steps can make a big difference. The main goal inside is to prevent embers that find their way in from starting a fire. Start by sealing any gaps around doors and windows where embers could blow through. If you have a dog door, make sure it has a solid, sealable cover. Inside, consider using fire-resistant window coverings like shutters or heavy drapes, which can add another layer of protection if your windows break. Having fire extinguishers easily accessible in key areas like the kitchen and garage is also a simple but critical step for handling any small fires that might start.
Essential Documents and Plans
Physical preparations are only one part of the equation. Having a clear plan is just as important for your family’s safety and your financial recovery. This starts with creating a personal Wildfire Action Plan that outlines your evacuation routes, communication strategy, and emergency contacts. You should also assemble a "go-bag" with essentials for each family member and gather important documents like insurance policies, deeds, and passports in one fireproof, accessible location. Don’t wait until you see smoke to figure out what to do. A well-rehearsed plan reduces panic and ensures everyone knows their role when it matters most.
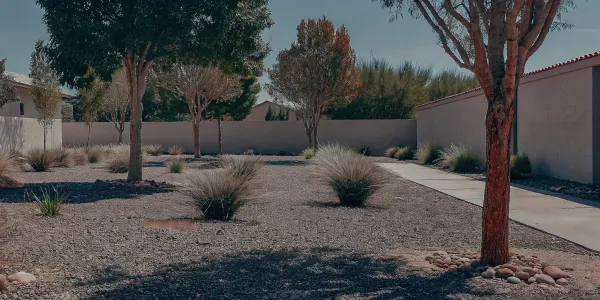
Creating Defensible Space: The 3-Zone System
Think of defensible space as a buffer you create between your home and an approaching wildfire. It’s one of the most effective ways to protect your property, and it’s something insurers and fire departments look at very closely. The goal is to reduce or eliminate flammable vegetation and materials immediately surrounding your house, giving firefighters a safer area to defend it. By managing the landscape, you can slow a fire’s spread and reduce its intensity.
California law requires homeowners in high-risk areas to maintain 100 feet of defensible space. This is typically broken down into three distinct zones, each with its own set of rules. Managing these zones isn't about clear-cutting your property; it's about strategically creating a landscape that is less likely to carry a fire to your front door. Taking these steps can dramatically increase your home’s chance of survival and is a critical part of keeping your property insurable. You can start your Wildfire Action Plan to get a personalized assessment of your property's needs.
Zone 1: The Immediate Zone (0-5 feet)
This is the most critical area and is often called the ember-resistant zone. Your goal here is to eliminate anything that can ignite from flying embers. This five-foot perimeter around your home and under your deck should be completely free of flammable materials.
Start by removing wood mulch, dead leaves, pine needles, and dry grass. Replace them with non-combustible options like gravel, pavers, or concrete. Prune any tree branches that hang over your roof or touch the side of your house. Move firewood piles and flammable patio furniture out of this zone entirely. By creating a sterile, non-flammable barrier, you make it much harder for a fire to make direct contact with your home.
Zone 2: The Intermediate Zone (5-30 feet)
In the zone stretching from 5 to 30 feet from your home, the focus shifts to interrupting the fire's path. The guiding principle here is "lean, clean, and green." You want to create spacing between trees and shrubs to prevent fire from jumping from one plant to another.
Mow your lawn regularly and remove all dead plants, weeds, and dry leaves. Prune tree branches so they are at least six feet from the ground. This prevents a ground fire from climbing into the tree canopy. According to Cal Fire guidelines, creating these fuel breaks is essential for slowing a fire’s momentum and reducing the heat it generates as it nears your home.
Zone 3: The Extended Zone (30-100 feet)
This outer zone acts as a final buffer to slow an approaching wildfire. You don’t need to remove all vegetation here, but you should thin it out to reduce the overall fuel load. Remove dead trees and shrubs, and ensure there is adequate horizontal and vertical space between remaining trees and plants.
The goal is to keep the fire on the ground and less intense. Clear out thick, dense vegetation that could create a "fire ladder" into the treetops. While this zone requires less intensive management than the first two, regular maintenance is key to keeping your property protected and compliant with local fire codes.
Choosing the Right Fire-Resistant Materials
When we think about wildfire defense, we often picture clearing brush and trees. While that’s essential, the materials your home is built from are just as critical. Embers—the tiny, burning pieces of debris that can travel a mile or more ahead of a fire—are responsible for igniting the majority of homes lost in wildfires. They find their way into tiny cracks, land on flammable roofs, and ignite vulnerable siding.
Choosing fire-resistant materials is one of the most effective long-term strategies for protecting your property. It’s not just about building a fortress; it’s about removing the fuel that a wildfire needs to spread. Insurers are paying close attention to these features. A home built with non-combustible materials is a much better risk, which can directly impact your ability to get and keep affordable coverage. Upgrading your home’s most vulnerable components with the right materials is a powerful step toward resilience.
Fire-Resistant Roofing
Your roof is your home's first line of defense against a shower of embers. It’s the largest, most exposed surface, making it the most vulnerable point of ignition. That’s why selecting the right material is non-negotiable. You should opt for materials with a Class A fire rating, which is the highest level of fire resistance.
Excellent choices include:
- Metal
- Clay or concrete tiles
- Slate
- Asphalt shingles rated as Class A
Wood shake shingles, even if treated, are a significant liability in a high-risk fire area and are often a primary reason for non-renewal. When replacing your roof, also consider installing a fire-resistant underlayment for an added layer of protection.
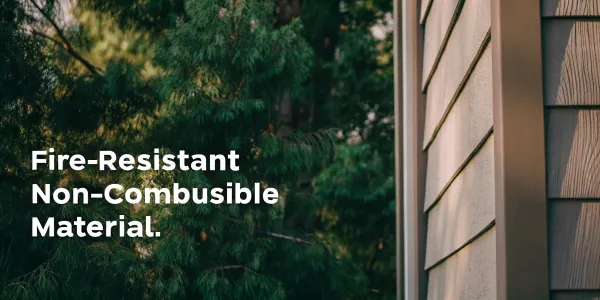
Fire-Safe Siding and Walls
The exterior walls of your home are another large surface area that can be exposed to intense heat and embers. If your siding is made of a combustible material like wood, it can easily ignite and carry flames up to your eaves and roof.
The best choices for fire-safe siding are non-combustible or ignition-resistant materials. Think about using:
- Stucco
- Fiber-cement siding
- Brick or stone veneer
Just as important as the material itself is sealing any gaps. Embers are tiny and can slip into small openings around windows, doors, and utility penetrations. Use a high-quality, fire-rated caulk to seal every crack and prevent embers from finding a way inside your walls.
Secure Windows, Doors, and Vents
Windows and vents are the weakest points in your home's exterior shell. The radiant heat from a nearby wildfire can be intense enough to shatter single-pane glass, allowing embers and flames to enter your home instantly. Upgrading to dual-pane windows with tempered glass on at least one of the panes provides significantly more protection.
Vents—for your attic, crawlspace, and dryer—are open invitations for embers. To secure them, cover all vent openings with 1/8-inch metal mesh screening. For the highest level of protection, you can install specialized, ember-resistant vents that are designed to block embers while still allowing for airflow.
Safer Decking and Fencing
Decks and fences can act as a "fuel ladder," giving fire a direct path to your house. A wooden deck attached to your home or a wood fence that connects to your siding creates a dangerous vulnerability. When building or replacing a deck, choose ignition-resistant materials like treated wood or composites, and be sure to keep the area underneath it clear of flammable debris.
For fencing, the five feet closest to your home are the most critical. If you have a wooden fence, replace the section connecting to your house with a non-combustible material like a metal gate. This creates a simple but effective break that can stop a fire from reaching your home.
Maintaining Your Fire-Hardened Home
Making your home more fire-resistant isn’t a one-and-done project. It’s an ongoing commitment to maintenance that keeps your property, your family, and your insurance coverage protected. Just like any other part of homeownership, regular upkeep is essential for ensuring your hardening measures remain effective season after season. By staying on top of a few key tasks, you can maintain your home’s defenses and give yourself peace of mind.
Your Seasonal Inspection Checklist
Think of this as your routine home health check-up for wildfire safety. At the start of each season, walk around your property and look for potential vulnerabilities. Are there new cracks in your siding? Has a screen on a vent come loose? Pay close attention to your roof and gutters, as they can easily accumulate flammable debris like leaves and pine needles. A consistent inspection schedule helps you catch small problems before they become major risks during a fire event. Making this a regular habit is one of the simplest and most effective ways to maintain a fire-resistant home.
Managing Vegetation and Clearing Debris
One of the most critical maintenance tasks is managing the space immediately surrounding your home. Your goal is to create a buffer zone where fire has nothing to feed on. Start by establishing a clear space of at least five feet around your foundation where there is nothing that can burn. This means removing flammable mulch, moving firewood piles at least 30 feet away from the house, and finding a new spot for brooms, recycling bins, and patio furniture. Regularly sweep away fallen leaves and clear any dead vegetation within this immediate zone to keep it clean and non-combustible.
Keeping Gutters, Roofs, and Vents Clear
Embers are a primary cause of home ignition during a wildfire. They can travel for miles and easily get trapped in gutters and on roofs, igniting any accumulated debris. That’s why keeping these areas clean is non-negotiable. Make it a monthly habit to clear out leaves, pine needles, and any other trash. Beyond cleaning, check your vents. Embers can be small enough to enter your attic or crawl space through unprotected openings. To prevent this, cover attic, soffit, and eave vents with a metal screen that has openings of 1/8-inch or smaller.
Common Home Hardening Mistakes to Avoid
Putting in the work to harden your home is a huge step toward protecting your family and property. But even with the best intentions, some common missteps can leave your home vulnerable. Making sure your efforts are focused on the right things is just as important as taking action in the first place. A detailed plan can help you identify and avoid these pitfalls. Here are the key mistakes to avoid.
Overlooking Key Vulnerabilities
One of the biggest mistakes is assuming that creating defensible space is enough. While clearing vegetation is critical, it doesn’t address the primary way homes ignite during a wildfire: embers. Ignoring small openings and gaps that embers can enter can lead to significant vulnerabilities. Wind-blown embers can be as small as a grain of sand and can travel a mile or more ahead of the fire. They get lodged in tiny crevices, under eaves, in gaps around windows, and through unscreened vents. Sealing these entry points is one of the most effective actions you can take to prevent ember attacks from igniting your home from the inside.
Skipping Critical Maintenance
Home hardening isn't a one-time project; it requires consistent upkeep. It’s easy to install fire-resistant vents and then forget about them, but they need to be kept clean to work properly. According to the Ventura Regional Fire Safe Council, "Ember entry through vents can result in ignition of combustible materials in the attic or crawl space, and result in a building burning from the inside out." The same goes for your roof and gutters. A gutter clogged with dry leaves or pine needles provides the perfect fuel for embers to ignite. Make seasonal inspections and cleaning a non-negotiable part of your home maintenance routine. This simple habit ensures your hardening features can do their job when it counts.
Using the Wrong Materials in High-Risk Zones
Your choice of building materials can either protect your home or create a direct path for fire to reach it. A flammable wooden fence attached to your house, for example, can act like a wick, carrying flames directly to your exterior walls. As the Lake Valley Fire Protection District notes, you should "consider using ignition-resistant or non-combustible fence materials to protect your home." Interrupting that path with a five-foot section of metal or masonry where the fence meets the house can make all the difference. This same logic applies to decks, siding, and even the mulch in your garden beds. Always choose non-combustible options for anything within five feet of your home’s foundation.
Home Hardening and Your Insurance: Staying Covered
Taking steps to harden your home isn't just about physical protection—it's one of the most powerful moves you can make to maintain your insurance coverage in a high-risk area. As insurers re-evaluate risk, a fire-hardened home becomes a much more attractive, and insurable, property. Proactive mitigation demonstrates to carriers that you are a responsible homeowner committed to reducing risk, which can be the deciding factor in whether you get renewed or find affordable coverage.
By documenting your upgrades and sharing them with your agent, you provide tangible proof that your home is a lower risk than others in the area. This can help you secure a policy, avoid non-renewal, and potentially access better premium rates. It’s a practical way to regain some control in a challenging insurance market, showing that your property is a responsible risk worth taking on.
What Insurers Look For (and How to Get Discounts)
Insurance companies are looking for clear evidence that you're actively reducing your property's wildfire risk. They focus on key mitigation efforts that have the biggest impact, including creating defensible space, using fire-resistant building materials, and upgrading vulnerable areas like vents, eaves, and decks. The good news is that these efforts can lead to real savings. Many insurers now offer significant discounts for wildfire mitigation, with some homeowners saving 20% or more on their premiums. To get these discounts, you'll need to provide proof of your upgrades, so be sure to keep receipts, take before-and-after photos, and get official certifications for any work done.
Meeting California's Building Codes
For many California homeowners, the FAIR Plan has become a necessary last resort for coverage. But even if you're on the FAIR Plan, you still have opportunities to lower your costs. The California FAIR Plan offers members up to a 14.5% discount on their premium if they've taken steps to harden their home according to state standards. This often involves meeting specific building codes designed to resist ignition from embers. Key upgrades include installing ember-resistant fire-rated vents, using non-combustible materials for roofing and siding, and ensuring windows are dual-paned with tempered glass. Adhering to these codes not only makes your home safer but also directly reduces your insurance costs, making your property more resilient in every sense.
How to Prioritize Upgrades on a Budget
The idea of retrofitting your entire home can feel overwhelming, especially when you consider the cost. But home hardening doesn’t have to be an all-or-nothing project that drains your savings. The key is to prioritize. By focusing on the most effective upgrades first, you can make a significant impact on your home’s resilience and insurability without needing a massive budget.
Think of it as a strategic plan. You can start with simple, low-cost fixes that address the most common vulnerabilities, like ember intrusion. Many of these initial steps are maintenance-focused and cost more in time than money. From there, you can plan for larger, more expensive projects over time, perhaps tackling one major upgrade every year or timing them with necessary home repairs. This phased approach makes the process manageable and demonstrates to insurance carriers that you are actively reducing your property’s wildfire risk—a crucial factor in today’s challenging insurance market.
Start with High-Impact, Low-Cost Fixes
You can make your home significantly safer from embers without a major renovation. Start with these essential, budget-friendly tasks that address the most immediate threats. First, focus on your roof. Keep it and your gutters completely clear of leaves, pine needles, and other debris where embers could land and ignite. While you're up there, replace any loose shingles and cover all vents—including those on the attic, soffits, and eaves—with 1/8-inch metal mesh to block embers. Next, create a fire-resistant zone by removing flammable mulch, yard debris, and firewood from the first five feet around your home. Finally, walk the perimeter of your house and seal any small openings where embers could slip through.
Planning for Bigger Projects
When your budget allows for larger projects or when it's time for a replacement, prioritize materials that resist fire. If you're building or replacing a deck, for example, choose non-combustible or ignition-resistant materials. The same principle applies to siding and roofing. Upgrading to tempered, double-pane windows is another critical step, as they are far more resistant to breaking from heat, which prevents flames and embers from entering your home. According to FEMA's checklist for homeowners, enclosing the underside of eaves and soffits can also prevent heat and embers from getting trapped. These larger investments not only harden your home but are also major signals to insurers that your property is a lower risk.
Create Your Home Hardening Plan Today
Getting started with home hardening can feel like a massive project, but you don’t have to do everything at once. The key is to create a clear plan that prioritizes the most effective actions for protecting your home from wildfire, especially from flying embers, which are the leading cause of homes igniting during a wildfire.
Your first priority should be creating a non-combustible area directly around your home. This is often called the "immediate zone" or Zone 0. Start by establishing a clear five-foot perimeter around your foundation. This means removing mulch, dead leaves, flammable plants, and even outdoor furniture that could catch fire. According to the Los Angeles Fire Department, this simple step creates a critical defensible space that can stop a ground fire from reaching your house.
Next, look up. Your roof is your home's largest surface and its first line of defense. If you have an older wood-shake roof, replacing it with fire-resistant roofing materials like asphalt shingles, metal, or tile (rated Class A) is one of the most important upgrades you can make. While you’re at it, make sure your gutters are consistently cleared of leaves and pine needles. Embers can easily ignite this debris and spread fire to your roofline.
Finally, focus on the small openings where embers can sneak inside. Cover attic, soffit, and eave vents with 1/8-inch metal mesh screening. This simple, low-cost fix prevents embers from getting into the most vulnerable parts of your home. Regular maintenance, like clearing yard debris and moving firewood piles at least 30 feet from your home, is also essential for preparing homes for wildfire season after season.
Building a plan helps you tackle these steps methodically. Instead of guessing where to start, you can focus your time and budget on the upgrades that matter most to your safety and your insurance provider. Ready to build a personalized checklist for your property? Start your free Wildfire Action Plan now and get a clear roadmap for protecting your home.
Related Articles
- Wildfire Risk Insurance: A Complete Guide
- How to Assess Your Home's Wildfire Vulnerability
- 7 Fire Resistant Home Improvements for Northern California
Pay Less for Home Insurance
and Avoid Non-Renewal?
Our partner, Five Bays Insurance Agency, offers a free policy checkup that spots hidden discounts to make sure you’re not paying more than you should.
Frequently Asked Questions
What’s the difference between home hardening and defensible space? Think of it this way: defensible space is about managing the area around your home, while home hardening is about improving the physical structure of the house itself. Defensible space involves clearing vegetation in zones to slow a fire down before it reaches you. Home hardening focuses on upgrading things like your roof, vents, and windows to prevent flying embers from igniting the building. Both are essential, but they address different parts of your property’s overall wildfire defense.
I'm on a tight budget. What are the first things I should do? You can make a huge difference without spending a lot of money. Start with the simple, high-impact tasks that cost more in time than cash. Your first priority should be creating a five-foot non-combustible zone directly around your home’s foundation. This means clearing away all leaves, pine needles, wood mulch, and even flammable patio furniture. Next, thoroughly clean your roof and gutters. Finally, cover all your exterior vents with 1/8-inch metal mesh to block embers from getting inside.
Will hardening my home guarantee I can keep my insurance? While there are no absolute guarantees in today's insurance market, hardening your home is the single most powerful action you can take to improve your chances. It provides tangible proof to insurers that you are actively reducing your risk, making your property a much better bet than a neighboring home that hasn't been upgraded. In a competitive market, these mitigation efforts can be the deciding factor that leads to a renewal or helps you find a new policy.
My roof isn't made of wood shakes. Do I still need to worry about it? Yes, absolutely. Even the most fire-resistant roofing materials, like metal or tile, can become vulnerable if they are covered in flammable debris. Flying embers can easily ignite a buildup of dry leaves or pine needles in your gutters or on the roof itself, which can then spread fire to the edge of your roofline or eaves. Consistent cleaning is a critical maintenance step for any type of roof in a high-risk fire area.
How can I show my insurance agent the work I've done? Documentation is your best friend. Before you start any project, take clear photos of the area. Take more photos after the work is complete. Keep every receipt for materials and every invoice from contractors you hire. If you get an official certification for an upgrade, like a Class A fire rating for a new roof, make sure you have a copy for your records. Providing your agent with a complete file of this evidence makes it easy for them to see and validate the risk-reduction steps you’ve taken.