The Essential Emergency Preparedness Kit Food List
Get a practical emergency preparedness kit food list with tips on storage, nutrition, and planning to keep your family safe and ready for any situation.
You already know you need an emergency kit. But a truly effective plan goes beyond a few cans of beans and some bottled water. What happens when the power is out for a week? How do you manage food allergies or dietary needs in a crisis? A well-thought-out supply is about more than just calories; it’s about nutrition, safety, and morale. This guide will help you think through the details that matter, from creating balanced meals without a kitchen to understanding the difference between "best by" and "use by" dates. We’ll show you how to build an emergency preparedness kit food supply that is truly resilient.
Key Takeaways
- Calculate Your Needs First: Before buying anything, create a clear plan. Aim for a two-week supply of food with at least 1,500 calories per person per day, and most importantly, store one gallon of water per person per day.
- Build a Balanced and Personal Kit: Combine affordable staples like rice and beans with high-energy snacks and convenient pre-packaged meals. Always customize your supply to accommodate your family’s specific needs, including allergies, picky eaters, and pet food.
- Protect Your Supply with Smart Storage: Your food is only useful if it's safe to eat. Keep everything in a cool, dark, dry place, use airtight containers to prevent spoilage, and set a six-month calendar reminder to inspect your items and rotate older stock into your regular pantry.
Building Your Emergency Food Supply: Where to Start
When a wildfire threatens your community, the last thing you want to worry about is where your next meal will come from. Evacuation orders, power outages, and disrupted supply chains can cut off access to grocery stores for days or even weeks. Building an emergency food supply is a critical step in any solid preparedness strategy, giving you and your family security and peace of mind. It’s about taking control in a situation that feels uncontrollable.
Creating a stockpile might sound like a massive project, but it doesn’t have to be overwhelming. You can start small and build it over time. The key is to be strategic. It begins with understanding what real food security means in a crisis, figuring out exactly how much food your family needs, and deciding on the right types of food that will last until you need them. Breaking it down into these manageable steps makes the process feel much more achievable. A well-stocked pantry is a core component of a complete Wildfire Action Plan, ensuring you’re ready for whatever comes your way.
What Food Security Really Means
In an emergency, food security isn’t just about having calories; it’s about having consistent access to safe, sufficient, and nutritious food that meets your family’s dietary needs. It’s easy to assume that emergency food has to be bland or unhealthy, but that’s far from the truth. A common misconception is that canned foods lack nutritional value, but many non-perishable items are packed with essential nutrients and can form the foundation of a healthy crisis diet. Your goal is to build a supply that not only keeps you fed but also keeps you healthy and resilient when your body needs it most.
How to Calculate Your Family's Needs
To figure out how much food you need, start with a simple baseline. An adult needs about 1,200–1,500 calories per day to get by in an emergency. For a 30-day supply, that means one person needs around 45,000 calories total. Multiply that by the number of people in your household to get your target. Remember to account for everyone—children, seniors, and anyone with higher caloric needs. Don’t forget to include pets in your calculations, as they’ll need their own supply of food and water. A little planning now ensures no one goes hungry when it matters most.
How Long Should Your Food Supply Last?
While many guides recommend a 72-hour kit, wildfires can cause disruptions that last much longer. A more realistic goal is to have at least a two-week supply of food and water on hand. When choosing what to stock, shelf life is a major factor. Most standard pantry items expire within one to three years. For longer-term security, you might consider specialized emergency food products. Freeze-dried and dehydrated foods are designed for stability, with shelf lives that can extend 20 years or more, making them a reliable "set it and forget it" option for your core emergency kit.
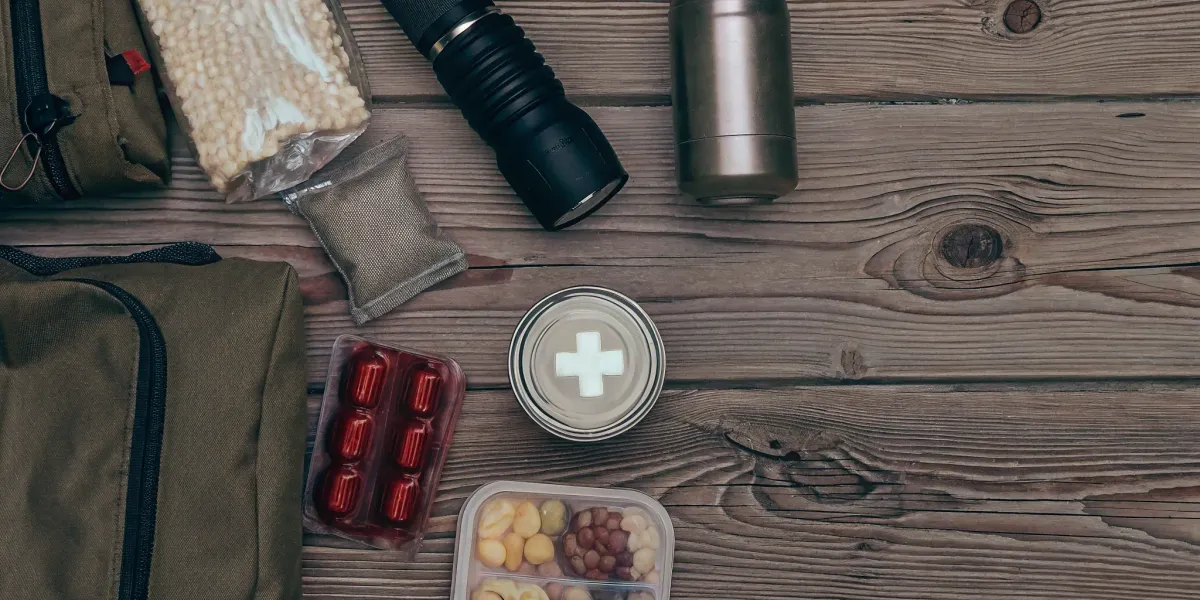
Your Go-To Grocery List for Emergencies
When an evacuation order comes, the last thing you want to worry about is what to eat. Having a well-stocked emergency food supply gives you peace of mind and ensures your family stays fed and energized during a crisis. The key is to focus on foods that are shelf-stable, require little to no cooking, and meet your family’s nutritional needs. Think of this as your foundational grocery list—items you can buy over time to build a reliable kit without breaking the bank. Start with a three-day supply for your "Go Bag" and aim to build a two-week supply for your home.
Must-Have Non-Perishable Foods
Your emergency pantry should be built on a foundation of non-perishable staples that provide essential calories and nutrients. These are the foods that will sustain you when fresh options aren't available. Focus on items with a long shelf life that your family will actually eat. A good starting point includes things like rice, beans, pasta, and canned goods. Canned meats, fish, fruits, and vegetables are excellent because they are already cooked and can be eaten straight from the can. Don't forget comfort items like coffee or tea, as a little bit of normalcy can go a long way in a stressful situation.
Here are some of the top survival foods to store:
- Rice and pasta
- Canned or dried beans
- Canned meat and fish (tuna, chicken, salmon)
- Canned vegetables and fruits
- Powdered milk and honey
- Whole-grain cereals or oatmeal
High-Energy Foods and Snacks to Include
During an emergency, your body is under more stress, and you may be more physically active than usual. That’s why high-energy snacks are a critical part of your kit. These are items you can eat on the go without any preparation, giving you a quick boost when you need it most. Look for foods high in protein, healthy fats, and calories. Peanut butter is a fantastic option, lasting up to five years while providing a dense source of energy. Dried fruits and nuts are also perfect for emergency bags, offering quick energy, fiber, and protein. Granola bars, protein bars, and trail mix are other easy, no-fuss options to keep your energy levels stable.
Planning for Special Dietary Needs
An emergency food plan is only effective if everyone in your household can eat the food you’ve stored. When building your kit, take a careful inventory of your family’s dietary needs. This includes allergies, intolerances, and medical diets. If you have an infant, be sure to stock ready-to-use formula and baby food. Don’t forget about your pets—pack enough of their specific food and any necessary medications. Thankfully, many companies now offer emergency food kits with vegetarian, gluten-free, and other specialized options, making it easier to find foods that work for everyone. Always read the labels and store special-needs items together so they’re easy to find.
How to Safely Store Water
Water is the single most important item in your emergency kit. Without access to clean drinking water, your situation can become dangerous very quickly. The standard recommendation is to store at least one gallon of water per person, per day. Your wildfire ‘Go Bag’ should contain a three-day supply for each family member. For your stay-at-home kit, the American Red Cross suggests having a two-week supply on hand. The safest and easiest option is to buy commercially bottled water and store it in a cool, dark place. Avoid storing it in areas with direct sunlight or extreme temperature changes, as this can degrade the plastic over time. Remember to include a portable water filter or purification tablets as a backup.
A Guide to Pre-Packaged Emergency Meals
If building a food kit from scratch feels overwhelming, pre-packaged emergency meals are a reliable and convenient alternative. These kits are designed for long-term storage and take the guesswork out of planning. They offer a straightforward way to ensure you have the calories and nutrition needed to get through a crisis, which is a core part of any solid wildfire action plan. Companies specializing in this space have refined their offerings to cater to different needs, from short-term evacuation scenarios to long-term emergencies where you might be sheltering in place for weeks.
While the initial cost can be higher than a DIY kit, you’re paying for convenience, long shelf life, and professionally balanced nutrition. These kits are compact, easy to store, and often come in durable, waterproof containers—a major plus when you need to grab them and go.
A Look at Top Emergency Food Brands
Several reputable companies offer high-quality emergency food kits. ReadyWise, for example, provides a wide range of options, from 72-hour kits for quick evacuations to one-year supplies for long-term security. Good To-Go focuses on dehydrated meals made with real ingredients, offering a popular 5-day survival food pack that’s great for families. Another trusted name is Augason Farms, which sells kits emphasizing quality, long shelf life, and nutritional value. When comparing brands, look at the variety of meals, dietary options (like gluten-free or vegetarian), and the packaging quality.
Freeze-Dried vs. Dehydrated: What's the Difference?
You’ll see two main types of food preservation in these kits: freeze-dried and dehydrated. While both remove water to prevent spoilage, the process is different. Dehydration uses heat to evaporate moisture, while freeze-drying involves freezing the food and then removing the ice in a vacuum. This difference impacts shelf life significantly. According to emergency food specialists, properly stored freeze-dried foods can last up to 30 years, whereas dehydrated foods typically last between five and 20 years. Freeze-dried meals also tend to retain more of their original texture and nutritional value, though they often come at a higher price.
Comparing Cost and Value
The price of emergency food kits varies widely based on duration, brand, and food type. For instance, a 72-hour kit from ReadyWise might cost around $45, while a one-month supply could be closer to $280. A 5-day kit from Good To-Go typically runs about $140. Instead of just looking at the sticker price, calculate the cost per person, per day. More importantly, check the cost per calorie. A cheaper kit with fewer calories isn’t a good value. Think of this as an investment in your family’s safety and peace of mind—having a reliable food source ready can make all the difference during an emergency.
How to Read the Nutrition Labels
When evaluating a kit, ignore the "number of servings" and go straight to the total calories. A "serving" can be misleadingly small. An adult needs roughly 1,200–1,500 calories per day just to survive, so a 30-day supply for one person should contain around 45,000 calories. Look for a good balance of protein, carbohydrates, and fats. Also, check the sodium content, as it can be very high in preserved foods. If anyone in your family has allergies or dietary restrictions, carefully review the ingredient lists for every meal included in the kit.
How to Store Your Emergency Food Supply
Building your food supply is a huge step, but how you store it is just as critical. The last thing you want during an emergency is to discover your food has spoiled or been ruined by pests. Proper storage protects your investment and ensures your family has safe, edible food when you need it most. By following a few simple guidelines, you can keep your supply ready for action.
Find the Right Spot: Temperature and Environment
The golden rule for food storage is to find a cool, dark, and dry place. Heat, light, and moisture are the enemies of shelf-stable food, causing it to lose nutritional value and spoil faster. A basement, interior closet, or even the space under a bed are often better choices than a garage or attic, where temperatures can swing dramatically. For the best quality, you should store canned foods in these conditions and aim to use them within a year. Avoid storing food under sinks where leaks can occur or near appliances that generate heat.
Choose the Best Containers for the Job
Original packaging isn't always built to last. Pests can easily chew through cardboard boxes and thin plastic bags. To protect your supply, transfer bulk items like rice, beans, and flour into more durable containers. The best options are airtight plastic food storage containers, glass jars with secure lids, or sturdy metal cans. This extra step not only keeps pests and moisture out but also prevents accidental spills and makes your supply much easier to organize. Investing in quality containers ensures your food remains safe and sanitary until you need it.
Keep Your Supply Organized
An organized kit is an effective kit. When you’re under stress, you need to be able to find what you need quickly. Start by grouping similar items together—all your canned goods in one bin, snacks in another. Use a permanent marker to write the purchase date on every item, especially if it doesn't have a clear expiration date. This simple habit helps you track the age of your food. For even better management, consider keeping a simple inventory list on your phone or taped to the inside of your pantry door. It makes checking your stock and identifying what needs to be replaced a quick and painless process.
Master the "First-In, First-Out" Rule
To prevent waste and ensure your food is always fresh, adopt the "First-In, First-Out" (FIFO) method. It’s a simple concept: use your oldest food first. When you buy new items for your emergency kit, place them at the back of the shelf or bin. When you need to use something or it's time to rotate your stock, take items from the front. This system of regularly rotating your supply ensures that nothing expires and gets thrown away. It also encourages you to incorporate your emergency food into your regular meals, making the entire process more manageable and budget-friendly.
Keeping Your Food Supply Safe and Ready
Building an emergency food supply is a huge step, but your work isn't done once the shelves are stocked. Proper maintenance is key to making sure your food is safe, edible, and ready the moment you need it. This means understanding date labels, storing items correctly, and knowing how to spot spoilage. A well-maintained supply is a reliable one, giving you peace of mind when it matters most. Let's walk through the simple but crucial steps to keep your emergency food in top condition.
"Best By" vs. "Use By": What Do Dates Mean?
It’s easy to get confused by the dates stamped on food packages, but they don’t always mean what you think. Most of the time, these dates are about quality, not safety. A "Best By" or "Best if Used By" date is the manufacturer's recommendation for peak flavor and texture. The food is often perfectly safe to eat long after this date has passed. "Use By" dates are typically found on more perishable items and should be taken more seriously. For long-term storage, the difference is significant. For example, many freeze-dried foods have a "best if used by" shelf life of 30 years, while still being life-sustaining long after. Understanding food product dating helps you avoid wasting perfectly good food.
Best Practices for Preventing Spoilage
How you store your food is just as important as what you buy. The goal is to protect your supply from heat, light, moisture, and pests. Always store your emergency food in a cool, dark, and dry place, like a pantry, basement, or interior closet—never in a garage or attic where temperatures fluctuate wildly. For items without a clear expiration date, get in the habit of writing the purchase date on the package with a marker. While canned goods can last for years, it's best to use them within one year for optimal quality. Following these simple storage techniques will extend the life of your supply and ensure it’s ready when you need it.
How to Inspect Your Food Supply Regularly
Set a reminder to check on your emergency food supply every six to twelve months. This is a good time to rotate items and inspect everything for signs of spoilage. When you do, look for any containers that are rusty, leaking, bulging, or badly dented. Check that all seals on jars, pouches, and other packages are intact and unbroken. If a can hisses when you open it or the food inside is foamy or foul-smelling, throw it out immediately. Trust your senses—if something looks or smells off, it’s not worth the risk. Your regular inspections are your best defense against discovering that your carefully built supply has gone bad right when you need it most.
Safe Food Handling During an Outage
During a power outage or evacuation, your normal kitchen routines go out the window. Safe food handling becomes even more critical to prevent illness. If the power is out, keep your refrigerator and freezer doors closed as much as possible to maintain the cold temperature. A full, unopened freezer can keep food frozen for about 48 hours. Have a plan for cooking without electricity and cleaning without running water. This means having hand sanitizer, disposable wipes, and paper towels on hand. Having these supplies gathered in advance is crucial, as stores and pharmacies might be closed. Including these reminders in your personalized Wildfire Action Plan ensures you won’t forget these details in a stressful situation.
How to Prepare Food When the Power Is Out
A power outage during a wildfire emergency can last for days, making meal preparation a serious challenge. Without a refrigerator or electric stove, your options become limited. However, with the right supplies and a bit of planning, you can ensure your family stays fed and healthy. The key is to focus on no-cook meals and have a reliable, non-electric cooking method as a backup. This approach not only simplifies things during a stressful time but also helps conserve critical resources like water and fuel.
Your emergency food supply is your first line of defense. Having a well-stocked pantry with non-perishable items means you won't have to worry about where your next meal is coming from. Before an emergency hits, make sure you have a plan for how you’ll prepare these foods safely and efficiently.
Simple No-Cook Meal Ideas
When you can’t cook, focus on simple, nutrient-dense meals that require zero preparation. Canned meats, fish, and beans are excellent sources of protein that can be eaten straight from the can. Pair them with crackers for a complete meal. Dried fruits and nuts are perfect for high-energy snacks. You can also stock up on peanut butter, granola bars, and cereals that can be eaten dry. Think about creating simple "recipes" like a trail mix with nuts, seeds, and dried fruit, or a wrap using tortillas filled with canned chicken and shelf-stable condiments. Having these survival foods on hand removes the stress of cooking in a crisis.
The Only Cooking Gear You'll Need
If you plan to cook, you’ll need gear that doesn’t rely on your kitchen’s power. A portable camp stove, a small propane grill, or even a charcoal barbecue can be used outdoors for heating food. Make sure you have an ample supply of fuel stored safely away from your home. Your cooking kit should also include a manual can opener, a pot or pan, and basic utensils. Before an emergency, it's a good practice to regularly inspect your emergency food supply for any cans that are rusted, bulging, or dented, as these can be signs of spoilage and should be discarded immediately.
How to Conserve Water While Cooking
Water is a precious resource during any emergency, especially a wildfire. If you need to cook, plan one-pot meals to minimize the water needed for both cooking and cleaning. Use the liquid from canned vegetables or beans as a base for soups or to cook grains. It’s also wise to have disposable plates, cups, and utensils to avoid washing dishes. The American Red Cross advises gathering all necessary supplies, including water, well before an event, as stores may be inaccessible. Every drop you save is a drop you can drink later, so make water conservation a top priority in your meal prep plan.
Staying Safe: Food Prep Without Running Water
Food safety is critical when you don’t have access to running water for handwashing or cleaning surfaces. Keep a supply of hand sanitizer, disposable gloves, and antibacterial wipes in your emergency kit. Store all your food staples in airtight, waterproof containers to protect them from pests and contamination. Before eating, always inspect food packaging for any signs of damage. A solid plan for food storage and safe handling practices will help prevent foodborne illness when you’re most vulnerable. Think through your process step-by-step, from opening a can to serving the food, to identify and mitigate any potential safety risks.
Putting It All Together: Build Your Custom Kit
With the fundamentals covered, it’s time to assemble a food kit that works for you. There is no single perfect emergency kit; the right one is tailored to your family’s budget, tastes, and unique needs. The goal is to create a reliable resource that provides security and comfort when you need it most. Think of this as the final, most important step: turning a list of items into your family’s personalized food security plan. By balancing cost, convenience, and specific dietary requirements, you can build a supply that you can count on in any situation.
Building a Kit on a Budget
You don’t need to spend a fortune to be prepared. Building an emergency food supply on a budget is entirely possible if you approach it strategically. Instead of one massive shopping trip, try adding just one or two extra non-perishable items to your cart each time you go to the grocery store. Focus on affordable, long-lasting staples like rice, dried beans, pasta, and canned vegetables or proteins. As one homesteading guide notes, "Having non-perishable foods is very important for emergencies like natural disasters or job loss." These versatile basics form a solid foundation for your kit without straining your finances. This gradual approach makes preparedness a manageable part of your routine.
When to Consider Premium Food Choices
While building a kit from grocery store staples is effective, specialized emergency food products offer distinct advantages. These meals, often freeze-dried or dehydrated, are specifically designed for long-term storage. According to one supplier, "Emergency food storage products are designed for long shelf lives (20+ years), making them a good investment." This extended lifespan means you can store them and have peace of mind for decades without needing to rotate stock frequently. They are also lightweight, compact, and incredibly easy to prepare—often just requiring hot water. For households looking for convenience or a long-term solution, investing in a supply of these premium meals can be a practical choice.
Tailor the Plan to Your Family's Needs
Your emergency kit should be a reflection of your household. The Red Cross advises that you should "customize your kit to your family's specific needs," including enough food, water, and medical supplies to last for at least two weeks. Think through who you are providing for. Do you have an infant who needs formula and baby food? A picky toddler who will only eat certain things? What about pets? Be sure to include pet food and extra water for them. Also, consider any food allergies, dietary restrictions, or medical conditions. Including a few comfort foods, like chocolate or hard candy, can also make a stressful situation a little more manageable for everyone. Your Wildfire Action Plan can help you track these unique family requirements.
Set a Simple Maintenance Schedule
An emergency kit is only useful if its contents are safe to eat. Regular maintenance is critical to ensuring your supply is ready when you need it. A good practice is to "inspect your supply periodically to make sure there are no rusty, leaking, bulging or badly dented containers and no broken seals." Set a calendar reminder to check your kit every six months. During your check-in, look at expiration dates and rotate out any items that are nearing their date. Use the "first-in, first-out" method: move older items to your pantry for regular use and replace them with new supplies. This is also a great time to update the kit based on any changes in your family’s needs.
How to Plan for Balanced Nutrition
When you’re planning for an emergency, it’s easy to focus on just having enough calories to get by. But nutrition is about more than just survival; it’s about keeping your body and mind strong during a stressful time. A well-balanced diet can help maintain energy levels, support your immune system, and improve your mood—all critical things when you’re facing a crisis like a wildfire evacuation. Thinking about nutrition now means you’re not just stocking food, you’re stocking wellness for your family. A little planning ensures your emergency supply can provide comforting, balanced meals when you need them most.
Covering Your Nutritional Bases
Your body needs a mix of protein, carbohydrates, and healthy fats to function properly, and your emergency food supply should reflect that. Think of these as the three pillars of your pantry. For protein, stock up on canned items like tuna, chicken, beans, and lentils. Carbohydrates provide essential energy, so include things like rice, pasta, oats, and crackers. Healthy fats, found in nuts, seeds, and nut butters, are great for long-lasting energy. The key is variety in your food storage. A diverse supply not only prevents meal fatigue but also ensures you’re getting a broader range of essential vitamins and minerals to keep everyone healthy.
How to Create Balanced Meals
Aim to combine items from the three main food groups—protein, carbs, and fats—at each meal. This approach will help keep you feeling full and energized. For example, you could have a simple but effective meal by mixing canned chicken with crackers and a side of canned fruit. Another option is combining canned chili (protein and carbs) with a handful of nuts (fats). Even something as simple as peanut butter on crackers provides a good balance. Thinking in terms of combinations rather than single items will help you create well-rounded meals that are both satisfying and nutritionally sound, which can make a huge difference in morale during a tough time.
Managing Allergies and Dietary Restrictions
If someone in your family has a food allergy, intolerance, or specific dietary need, planning becomes even more critical. Carefully read the labels on all packaged foods you store. Many companies now offer emergency food kits tailored to specific diets, including gluten-free or vegetarian options. To prevent cross-contamination during a stressful emergency, store allergy-safe foods in a separate, clearly labeled bin. Make sure everyone in your household, including older children, knows where these foods are and understands their importance. For more guidance, organizations like Food Allergy Research & Education offer excellent resources for preparing an allergy-safe emergency plan.
Should You Include Vitamins and Supplements?
While a well-planned, varied food supply is your first line of defense, a multivitamin can be a smart backup. During a prolonged emergency, the limited variety in your diet might lead to nutritional gaps. Including a daily multivitamin for each family member can help fill those gaps and support overall health. This is especially important for children, pregnant individuals, and older adults who have specific nutritional needs. Before you buy, talk to your doctor about the right supplements for your family. Remember to store them in a cool, dark place and check the expiration dates periodically, just as you do with your food supply.
Related Articles
- Wildfire Car Emergency Kit: The Ultimate Checklist
- The Essential 14-Day Emergency Kit List [Checklist]
- How to Build a Wildfire Emergency Kit at Home
- How to Build an Emergency Kit for Wildfire
- How to Pack for a Wildfire Evacuation: A 5-Minute Guide
Frequently Asked Questions
How much food should I actually store? A 72-hour kit seems too short. You're right to question the 72-hour standard. While it's a good starting point for a portable "Go Bag," major events like wildfires can disrupt supply chains and keep you from returning home for much longer. A more realistic and safer goal is to have a two-week supply of food and water stored at home. This gives you a reliable buffer to handle extended power outages or evacuation orders without the stress of wondering where your next meal will come from.
Is it better to buy a pre-packaged kit or build my own from the grocery store? This really comes down to your priorities. Building your own kit is often more budget-friendly and allows you to customize it completely to your family's tastes and dietary needs. However, it requires more planning and regular maintenance. Pre-packaged kits are incredibly convenient and offer a very long shelf life—often 20 years or more—making them a great "set it and forget it" investment for your core supply. Many people find a hybrid approach works best: a long-lasting pre-made kit supplemented with familiar snacks and staples from the store.
What's the most common mistake people make with their emergency food? The biggest mistake is treating it as a one-and-done task. People will build a great kit, store it in the garage, and then forget about it for years. Your supply is only reliable if you maintain it. This means storing it in a cool, dark place to prevent spoilage from heat and light, and checking it every six to twelve months. During your check-in, you should inspect for damage and rotate out any items that are nearing their expiration date so your supply is always fresh and safe.
How do I handle food for family members with allergies or for picky eaters? An emergency kit is useless if no one can or will eat the food. When planning, carefully read the labels on everything you buy to avoid allergens. It's a good idea to store allergy-safe foods in a separate, clearly marked container to prevent any mix-ups during a stressful situation. For picky eaters, especially children, include familiar comfort foods like their favorite granola bars, crackers, or cereals. A little bit of normalcy can make a huge difference in keeping morale up.
Besides food, what's the most important thing I need for meal prep in an emergency? Without a doubt, you need a reliable supply of clean water and a manual can opener. Water is essential for drinking, but you'll also need it for rehydrating certain foods and for basic sanitation. Aim for one gallon per person, per day. Just as critical is a simple, non-electric can opener. The vast majority of shelf-stable emergency foods come in cans, and without a way to open them, your carefully planned supply becomes inaccessible right when you need it most.